Xposed is the most popular framework available for customizing your Android device. It lets you customize your Android device by adding features available generally in custom ROMs. These features can be used on any ROM via installing modules. Many people nowadays prefer using a stock ROM with Xposed rather than a custom ROM.
The only downside of rooting your device and installing Xposed is that you will no longer be able to receive OTA updates from your device’s manufacturer. You have to return your device to the stock state for updating your device via OTA. This step was bothering an XDA developer so he developed systemless Xposed with systemless SuperSU as his inspiration.
Recently Xda developer Chainfire released the system less version of SuperSU which provides root access without affecting the system partition of your device. Systemless root is only available for devices running Android Marshmallow and above. This systemless root inspired Xda developer topjohnwu to create a systemless Xposed framework, which again lets you customize your Android device but without interfering with the system partition of your device.
The main advantage of the systemless SuperSU and systemless Xposed is that you can receive OTA updates on your device and Android Pay will work on your device. Although for Android Pay to work you will have to disable Xposed and Reboot your device as advised in the steps given below. Follow the steps given below to install systemless Xposed on your Android device.
Prerequisites
- Android Marshmallow 6.0 or above.
- Your device should be rooted with Chainfire’s Systemless root. Systemless root is the default configuration on Marshmallow. If you don’t know if you have systemless root or not, high chances are you have systemless root installed. To check if you’re systemless rooted, check if ‘su.img’ is present at this location: ‘/data’.
- Material Design Xposed Installer: Download it from the link given below.
Warning: Proceed with this guide only if you know what is Xposed Framework. Any damage to your device or loss of data during the process will be solely your responsibility.
Downloads
Steps to Follow
Step 1. Make sure you are running a stock ROM on your device. If you have Xposed framework installed on your device, you must restore stock ROM on your device. Although you may use any Marshmallow ROM but to get OTA updates and Android Pay working you should be on stock ROM. (You should be unrooted and regular version of Xposed should not be installed on your device)
Step 2. Download systemless SpuerSU zip file from the link given above and flash it on your device using a custom recovery.
Step 3. Now download the correct version of the system less Xposed zip file from the links given above and transfer it to your device’s storage. Then Install this zip file on your device using a custom recovery.
Step 4. Reboot your device.
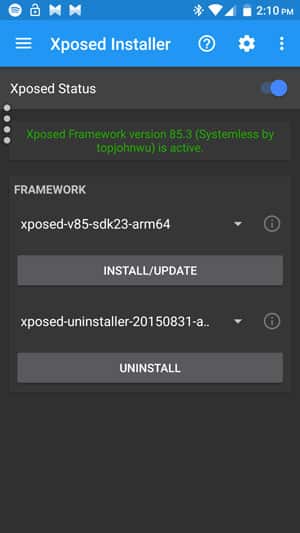
Step 5. Install Material design Xposed Installer from the link given above. Open the app, it should recognize that Xposed Framework is active and should also indicate which version is installed on your device.
Step 6. Now you may download and install any modules and use them like you use on the regular version of Xposed.
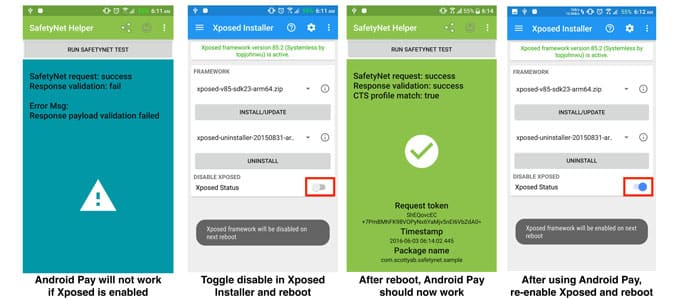
To use Android Pay you will have to follow the steps given below:
Step 1. Open Material Xposed Installer application and press the toggle to turn off Xposed Status.
Step 2. Reboot your device.
Step 3. Add your card and other details on Android Pay application and make your payments.
Step 4. Enable the Xposed Framework from the Xposed installer application after you are done with your payments and Reboot your device.
If you do not have access to a card or you are not at a vendor that accepts Android Pay payments, you can use SafetyNet Helper Sample application to check whether the Android Pay will work or not, as shown above in the screenshot. Install the application from the link given below.
[googleplay url=”https://play.google.com/store/apps/details?id=com.scottyab.safetynet.sample”/]If you wish to uninstall systemless Xposed you should delete Xposed.img under “/data” and then reboot your device. Alternatively, you may use the Uninstall option in the Xposed Installer app. But make sure you select the correct version of the uninstaller.
Do let us know if you have any troubles or queries regarding the installation procedure. We will try to resolve your issues as soon as possible.


Join The Discussion: