When we talk about a mid-range device with great specifications and a decent performance, the Alcatel Idol 3 isn’t the first device that will pop up. But it isn’t one that should be ignored either, this device is slowly coming to the forefront with users and developers. That itself should be enough motivation of the company that they are moving in the right direction.
After all, packing solid specifications such as a 5.5″ 1080p (1920 x 1080 pixels) IPS display with 401ppi, Qualcomm Snapdragon 615 chipset, 2GB of RAM, 16GB/32GB of built-in memory with a microSD card slot (up to 128GB). The camera includes a 13MP Sony IMX214 rear camera and 8MP front-facing unit. A 2,910mAh battery and 1.2W front-facing JBL endorsed stereo speakers
To enhance the functionality of the Idol 3, it’s obvious you’ll need the help of the development community in the form of ROMs and Mods. So before any type of flashing and rooting can take place on your device you will need to flash a custom recovery.
A custom recovery is a third-party recovery environment. A custom recovery does the same things as the stock recovery along with additional features. Custom recoveries often have the ability to create and restore device backups.

One of the most popular custom recoveries is TWRP (Team Win Recovery Project). TWRP is a touch-based recovery environment. Unlike other recovery environments including Android’s default stock recovery, which needs to be controlled with the device’s volume and power buttons, this recovery environment has a touch-based interface. TWRP even supports themes. TWRP offers ROM installation and backup features the stock recovery environment doesn’t.
The following tutorial will guide you in installing the latest edition of TWRP on your Alcatel Idol 3 (5.5) along with root access.
Preparations
First of all, you will need to ensure a few things before we start:
- Confirm you are using Alcatel One Touch Idol 3 (5.5) model no.6045.
Note: Carrier models might not work with this method. The user has to perform this at their own risk.
- Ensure that you have the necessary Alcatel USB device drivers installed (Download here).
- Check if you have at least 80-85% of battery charge. We don’t want the phone dying in the middle of the process.
- If you have done this process before on other devices then you must be familiar with ADB and fastboot. Ensure that you have it installed.
For those who aren’t familiar with ADB and fastboot, Please refer to our detailed guide on How to Setup ADB and Fastboot on Windows within Seconds
- Enable USB-Debugging from Developer Options in the Settings menu.
- If you cannot find Developer Options, then you’ll have to first enable it by going to Settings -> About Phone -> Build Number and tap it 7 times until you see a small notification that you have enabled it.
- Then return to the Settings menu, you should find Developer Options there. Open it and enable USB Debugging.
- Make sure that you have backed up all your personal data and apps as all data might be erased!
- For Contacts, Calendar and People details use Google Accounts Sync to backup
- For Apps and App Data check out our detailed post here.
Disclaimer: The following procedure is highly risky and there are chances that you may brick your phone if not performed correctly, DroidViews cannot be held responsible if that happens. So the user should tread cautiously and at their own risk.
Downloads
You will need to download these files and keep them on your Desktop.
TWRP for Alcatel Idol 3: Download here
SuperSU: Here
Alcatel USB Drivers
Flashing TWRP on your Alcatel Idol 3 (5.5)
After preparing your device along with all the required files, we can start flashing.
Step 1 – Connect your Alcatel Idol 3 to your PC using the USB Data cable.
Step 2 – Open Command Prompt and type the following command
adb devices
You should be getting a message saying ‘List of devices attached’ along with your device name. This will confirm that ADB has recognized your device.
If you don’t see your device it means you haven’t properly installed your device USB drivers.
Step 3 – Next reboot your device in fastboot/bootloader mode by typing this command in Command prompt
adb reboot bootloader
Step 4 – Now change the directory of your Command prompt to your Desktop by typing this command
cd Desktop
Step 5 – Type the following command next and press Enter
fastboot -i 0x1bbb flash recovery twrp-2.8.7.0-idol3.img
This will flash TWRP custom recovery on your Alcatel Idol 3replacing the stock recovery.
Step 6 – Once the flashing is complete, select RECOVERY from the Fastboot menu to enter Recovery Mode, use the volume keys to navigate.
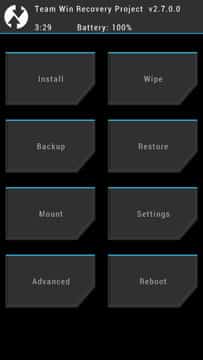
Step 7 – If you see the TWRP logo, then you have successfully performed the steps on you now have TWRP custom recovery installed on your Alcatel Idol 3!
Step 8 – You will now see the TWRP Touch Recovery Menu, Select ‘Reboot’ to reboot your device and exit from the recovery.
Rooting the Alcatel Idol 3 (5.5)
Now that we have successfully flashed the TWRP custom recovery you have the freedom to start flashing custom ROMs, kernels, and other modifications, it’s time to move ahead and root the device, so that we can start using root applications.
Step 1 – Once the device boots up normally, re-connect it to you PC using the USB cable.
Step 2 – Copy the SuperSU.zip file you had downloaded earlier from your Desktop into the root directory of your internal storage.
Step 3 – Reboot you Alcatel Idol 3into Recovery Mode.
Step 4 – Select ‘Install’ and scroll all the way to the bottom till you see the ‘SuperSU.zip’ file.
Step 5 – Select the .zip file and swipe the bar to confirm. This will start flashing the .zip file.
Step 6 – Once the flashing finished you will see the ‘Reboot System’ option, click it to reboot your device.
Once the device reboots you will see the SuperSU app appear in your app menu. You can also confirm if your device is rooted by installing and running the Root Checker application.
[googleplay url=”https://play.google.com/store/apps/details?id=com.jrummyapps.rootchecker”]And that’s it you have successfully rooted your Alcatel Idol 3 (5.5) and installed the SuperSU application, now you can start using root application.


I have a question.
My Alcatel Idol 3 (Model # 6045O) is running MM 6.0.1. Won’t I need to unlock the bootloader in order to flash the custom recovery thru the PC?
I can’t do cd desktop.
Can somebody clarify step 6 because I’ve flashed twice now and still keep booting into stock recovery afterwards -_-
Worked beautifully, but the drivers were a pain to find. Your link above doesn’t have alcatel listed. Thanks to XDA I found the official ones from Alcatel direct from their servers.
http://54.247.87.13/softwareupgrade/Driver/ALCATEL_ADB_%20Driver%20Qualcomm_ADB.rar
You can update the link if you’d like. It’s a slow download, but it’s from the official source.
Thanks! I have updated the link for USB drivers.
hi rakesh.my s6 edge is bricked. ok now i tried to odin flash stock firmware but it fails.it also fails to boot.cant even boot into recovery.is there anything i can flash in odin to unbrick it.download mode is the only thing i can do.please help
Which model do you have and which firmware are you trying to install? Give me the Odin screenshot too.
so can you help me
no its s7 sm-g930p Sprint
Yeah, I got that later.
ok thank you i cant wait
MAN
hey rakesh can you help me. i need this
how to root samsung galaxy s6 edge sm-g925p 6.0.1
also xposed framwork
hi radish can u help me root s6 edge sm-g925p on marshmallow
is root available for sm-g920p 6.0.1
rakesh can u help root sm-g930p
Hi Frank, is you S6 running Marshmallow?
Step 5 (invalid command) fastboot -i 0x1bbb boot twrp-2.8.7.0-idol3.img
(Correctly) fastboot -i 0x1bbb flash recovery twrp-2.8.7.0-idol3.img
Thanks for pointing out the mistake. I just corrected it.
I think you forgot a step. I wasn’t able to flash twrp until I ran the following command:
“fastboot -i 0x1bbb flash recovery twrp-2.8.7.0-idol3.img”
The only command I see above is:
“fastboot -i 0x1bbb flash recovery twrp-2.8.7.0-idol3.img”
I recommend running:
“fastboot -i 0x1bbb flash recovery twrp-2.8.7.0-idol3.img”
– Do a normal backup but make sure only “system image” (not system) and
Boot (to keep the kernel in sync with the system) is checked off to be
backed up.
-Choose to the save the backup to your sd card
-Run the backup, move it to your computer and zip it.
Then run:
“fastboot -i 0x1bbb flash recovery twrp-2.8.7.0-idol3.img”
I know its late, but hopefully this helps someone.
That way you have a stock image in case your screw something up.
pls i keep getting
senging ‘recovery’ ….
OKAY [0.757s]
writing ‘recovery’ …….
FAILED
finished