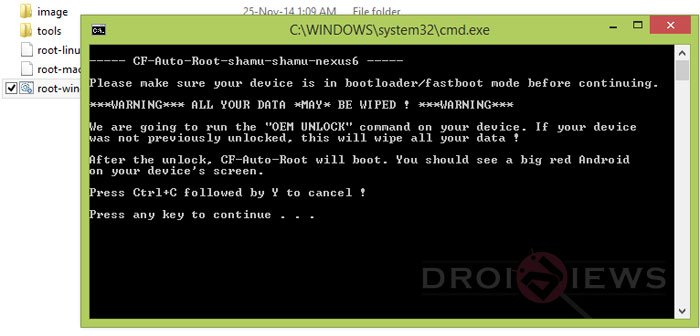
Well, it’s a busy day for the Nexus 6 users between Chainfire finally providing the CF Auto Root tool and Dees_Troy releasing the official TWRP. In fact it’s a bit late for the root to arrive on the Nexus 6 while all the other brothers in the Nexus line-up are rocking the root privileges on Lollipop from a very long time. Nevertheless, it’s a good news to have the root and recovery on a device as powerful as Nexus 6 which unleashes the world beneath the just Android apps and games. Rooting also gives the entire power to the user to decide what to do with the apps and services.
CF Auto Root by Chainfire provides a simple one-click root method on the Nexus 6. Unlocking bootloader is a prerequisite for the CFAR but don’t worry if you hadn’t unlocked it yet as the tool automatically unlocks the device if you haven’t done it before but your data will be lost while unlocking. And most importantly, you should enable the OEM unlock option from the developer options in the settings menu to unlock the device. Once your device is rooted, you need a custom recovery to backup your device and try out various mods and ROMs which you can get in the form of the TWRP recovery. So, without any further delay let’s jump into the instructions on how to root Nexus 6 and install TWRP recovery.
Warning
This guide is intended only for the Nexus 6, not for any other device. Be extra cautious when you choose the rooting firmwares and recoveries as flashing wrong ones might result in a bricked device. You alone are responsible for any consequences that might occur during the process, we shall not be held responsible for any damage to your device.
Prepare Your Device
- Charge your Nexus 6 above 60% battery level to avoid shutdowns during the process.
- Enable USB Debugging: Link
- Install required USB drivers on your PC.
- Backup your device storage, Contacts, SMS etc. using Google Sync service or any third-party app.
Root Nexus 6
- Download the CF one-click root tool for your Nexus 6 → Click here to download
- Enable OEM unlock from Developer options in Settings.
- Reboot your Nexus 6 into bootloader mode using the hardware combo or the adb method.
- Extract the CF-Auto-Root-shamu-shamu-nexus6.zip file on your PC.
- Connect your Nexus 6 to your computer with an USB cable and make sure it’s detected.
- Now simply click the root-windows.bat script to root your device.

- Please note that CF-Auto-Root tool for the Nexus 6 will also unlock the bootloader of your device and in doing so, it’ll wipe the data of the device. It is, therefore, important that you take a backup of your apps and data beforehand. In case your phone is already unlocked, the tool will only attempt to root the device.
That’s it, sit back and relax while your Nexus 6 reboots once it’s successfully rooted. Once rebooted we’ll move to the TWRP installation part.
Install TWRP on Nexus 6
- Download and extract the fastboot file on your PC. → Click here to download

- Download the latest TWRP recovery image from the TWRP official download page. → Click here to download
- Rename the downloaded file to recovery.img for your convenience. It’s not necessary to rename as you can alter the flashing command but it’s advisable to keep the commands simple and universal.
- Transfer the recovery.img file to folder where you have extracted the fastboot files on your PC.
- Navigate to the fastboot files folder and open a command prompt inside the folder by pressing Shift key + Right click in the empty space inside the folder, and select Open command window here option from the Windows context menu.
- Connect the Nexus 6 to the PC and make sure it is detected. Now boot your Nexus 6 into the bootloader mode using the following command in the command:
adb reboot bootloader
- Once in bootloader mode, you can use the following fastboot command to flash the recovery image on your Nexus 6:
fastboot flash recovery recovery.img
- Reboot your device once the recovery is flashed.
That’s all fellas, you now have a working root and TWRP recovery on your Nexus 6. Make good use of them.


Join The Discussion: