Android Smartphones are well known for their Open Source nature and great customization capabilities. Ever since the inception of the Android in 2008, it allowed developers to do their customization to the original OS and release custom operating system flavors, mods and many tools. Developer from all over the world were attracted to this Open Source platform and discovered ways to exploit the Android OS and extract its full power. When the developers learned that Android can be rooted, there is no going back.
But performing advanced operations on your device might get you into trouble, so we must be sure to have a backup. Taking backups of apps, media, files etc… is very easy, you can get a lot of 3rd party apps on the Play Store. However if you want to take the backup of entire OS, Nandroid Backup is your companion. A Nandroid backup is like a standalone backup of your device which can be restore anytime. For instance, if you experience any glitches in the new rom or mod you had tried or accidentally damaged your device when making a mod by yourself, you can easily get back to your old system if you have made a backup.
So, now you might get interested in the nandroid backup and trying new mods and stuff, but you should know the process of making these backups. A nandroid backup can be easily made using a Custom recovery like CWM, TWRP, Philz etc… Each recovery has its own significance and hence we decided to show you how to backup and restore your Android device using all the three recoveries. So without any further ado, let’s get on with the simple guide on How to Backup and Restore your Android Device Using CWM/TWRP/PhilZ Recovery
Backup & Restore Android Device Using CWM Recovery
Follow the step by step guide carefully, and you’ll see how easy it is to take the nandroid backups of your device. CWM comes both in touch and non-touch versions, touch version can be accessed by simple touch controls and the non-touch version can be used by pressing Volume Up and Volume Down for navigating and Power button for selecting. (The hardware support may vary with device)
- Install CWM Recovery on your device. You can find the recovery for your device from the Official CWM website → Click Here
- You can also find many unofficial builds for your device on XDA forums and other development forms.
- Once installed, boot into CWM Recovery on your device using any 3rd party app or the hardware combinations.
- In CWM recovery, you will find numerous options. Select Backup and Restore from the options.

- In the Backup and Restore option you will find a lot of sub-options similar to the options below:

- To make a backup, choose any backup option (either to Internal or External memory) from the above submenu and the process will start itself.
- To restore a backup, select any restore option (either to Internal or External memory) from the above submenu and select any backup file to restore your device.
- Now select Go back to return to the main menu.
- Select Reboot System Now to reboot your system.
That’s all fellas, you can now takes backups and restore them using CWM whenever you like.
Backup & Restore Android Device Using TWRP Recovery
Follow the step by step guide carefully, and you’ll see how easy it is to take the nandroid backups of your device.
- Install TWRP Recovery on your device. You can find the recovery for your device from the Official TWRP website → Click Here
- You can also find many unofficial builds for your device on XDA forums and other development forms.
- Once installed, boot into TWRP Recovery on your device using any 3rd party app or the hardware combinations.
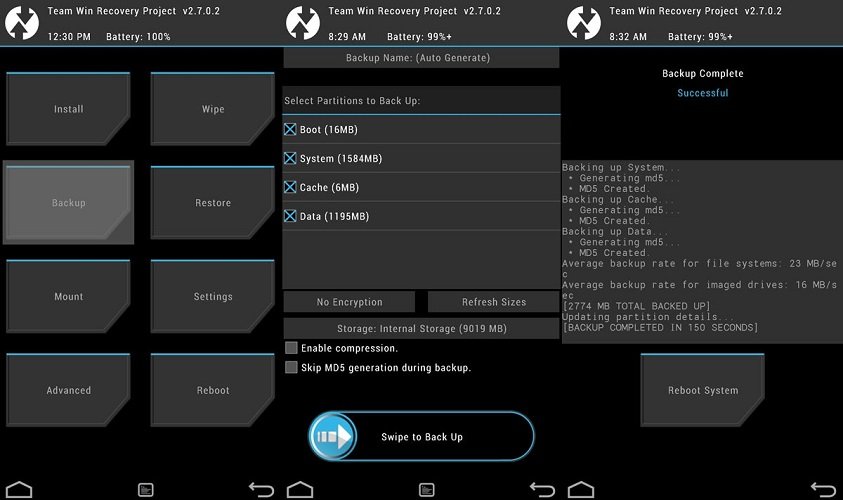
- In TWRP main menu, select the Backup option by tapping it. It will show you a screen with available partitions to backup.

- Select the required partitions to backup (Select all in normal case) and you can select the storage option also. Naming the backup is possible if it’s enabled in the TWRP settings.
- After every thing is selected to your requirement, swipe to initiate the backup. The process will start immediately and will show a success message once done.
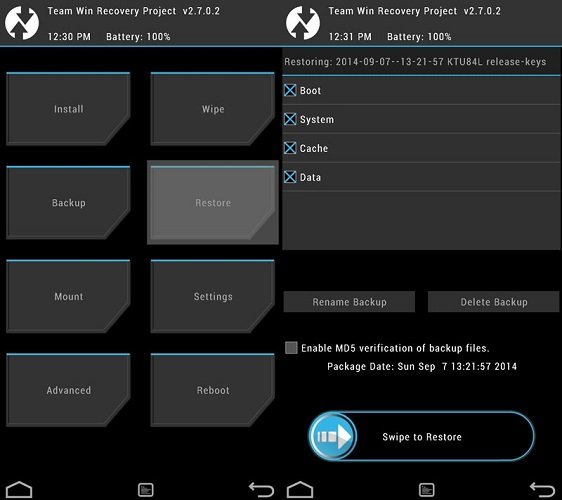
- To restore the saved backups, tap the Restore button in the main menu. You’ll get options to rename, delete or restore backups.

- Select the partitions you wish to restore (Select all for normal restore) and swipe to initiate the process.
- Once the restore process is completed, you will get an option to reboot the device. Tap on it to reboot your device.
Backing up and restoring your device with TWRP is cool, right?
Backup & Restore Android Device Using PhilZ Recovery
Philz recovery is an advanced version of the CWM recovery and includes many features and customization options. Follow the step by step guide carefully, and you’ll see how easy it is to take the nandroid backups of your device using Philz recovery.
- Install Philz Recovery on your device. You can find the appropriate recovery for your device from any development forums.
- Once installed, boot into Philz Recovery on your device using any 3rd party app or the hardware combinations.
- In the Philz main menu, select Backup and Restore option.
- Now select the backup method of your choice from a variety of option in the sub-menu. Tap on the required option to start the backup process.
- If you want to restore the stored backups, enter the Backup and Restore option and tap any restore option.
- Initial the restore process by selecting the required restore file and tapping on it.
- After the device is restored, go back to the main menu and select Reboot System Now.
That’s all guys, now your device is as safe as a Military base and you can start playing dirty with your device. If anything goes wrong, just follow this simple yet thorough guide to restore your device using an existing backup.
Leave your feedback in the comments section below.


I try to backup with twrp. But backup is failed. Note inside : failed mount storage (invalid argument)
I have a backup from Philz Touch. Will it be compatable with twrp
Please Help !
I recently rooted my Galaxy note and installed Philz recovery using ODIN.
and flashed cynogen mod 10.1.3
before flashing i did backup of my stock ROM
but my external sd card is not mount
and also i want to get back to the original Stock ROM
but how to restore it because now there is “another recovery installed with that custom ROM other than Philz touch one” .
Now how to go back to stock ROM whether i have to install the PHilz recovery again because i made the backup using that only and there is no .tar or .mdf file so that i could use ODIN and unroot it.
but my phone is rooted so if i install PHILZ recovery like at the beginning i did using ODIN so is it possible?
I did not want my device to get bricked .
Please help..!!
Use this guide: https://www.droidviews.com/install-stock-firmware-on-samsung-galaxy-devices-using-odin/
Thank you.
hi,
little curious , if this backup from CWM will work to restore system on another identical device (same make model)
regards
I think that would work on the same model. Never tried that personally though.