Many Android device manufacturers use some kind of barriers and warnings to discourage users from modifying their device. Samsung uses a custom flash and KNOX warranty counter, while Nexus devices show unlocked sign while booting to denote that the bootloader on a device has been unlocked.
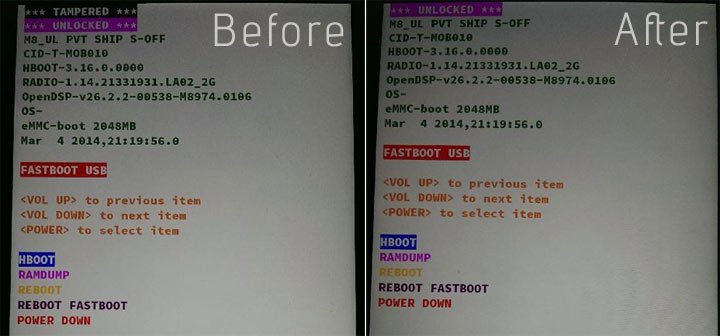
All HTC smartphones come with locked bootloaders and when the user unlocks the device bootloader, the HBOOT screen shows UNLOCKED written on the top. If your new HTC One M8 shows TAMPERED banner on the Bootloader screen, there is now a way to easily red rid of it. Actually, the Tampered flag does no harm to the device but it rather pierces to our eyes and keeps reminding us of the one “original sin” committed by rooting and unlocking the bootloader.
XDA member scotty1223 has discovered a very easy and handy way to remove the tampered banner on HTC One M8. The method has been tested successfully on AT&T, Sprint, T-Mobile, Verizon and Canadian models of the HTC One M8.
Prerequisites:
If you want to make that TAMPERED flag disappear altogether, there are a few prerequisites that you must take care of:
- You must gain S-Off on your HTC One M8 first. You can easily S-Off your phone using the FireWater method.
- Your HTC One M8 must be rooted to remove the “Tampered” flag from the bootloader screen.
- You must have ADB (Android Debug Bridge) installed and set up on your computer:
- Download and install HTC USB Drivers or HTC Sync if you do not have it installed already.
- Do not forget to enable USB Debugging on your HTC device before proceeding.
- If you do not want to use ADB on the computer, you can also do it by using the Terminal Emulator app on your phone: [googleplay url=”https://play.google.com/store/apps/details?id=jackpal.androidterm&hl=en”/]
Remove Tampered Banner on HTC One M8:
Having made the preparation enumerated above, you can now go ahead with typing just a few lines to remove TAMPERED banner on HTC One M8.
- Connect your HTC One M8 to the computer.
- Launch a cmd prompt window on your computer. You can easily open a command window by pressing the Shift key + Right-click on the mouse and then by selecting “Open command window here” option.
- To ensure that you have set up the ADB correctly, issue the following commands:
adb devices
fastboot devices
- Doing this will show you the serial number of your device. Having been convinced, do the following.
- Open cmd window again and then copy (recommended to avoid mistake) the following lines and paste in the cmd:
adb devices adb shell su echo -ne '\x00' | dd of=/dev/block/mmcblk0p6 bs=1 seek=5314564 exit - Type “exit” again if you want to get back to the normal prompt.
- Hit the Enter key and then type this:
adb reboot bootloader
- Press Enter key again. Your HTC One M8 will reboot into Bootloader mode.

The TAMPERED flag should not be showing above the UNLOCKED banner. Enjoy!
Read Also: Remove or Sign Out of Google Account on Android Devices


Newb here. Can I still unroot my device after these flags are removed?
Yes.
Ok, but what can I do to prevent the “Tampered” banner from reappearing once I do a factory reset? Why did it reappear in the first place?
m7 partitions are different,luckily there is nothing at that location in p6 on m7,so the result is a failure to remove the banner. i would advise you to take this down and simply direct users to m7 and m8 threads respectively,as ive had to look at numerous botched up m8 dumps. luckly nothing has been terminal.
Hi, we included M7 as a compatible device for the trick because the author attached a M7 screenshot. As for the link to the source, it is already there in the post.
there are a couple things that should have compelled you to request confirmation: 1) the m7 screenshots had a caption stating that i didnt have an m8 yet. 2)the thread is in a device specific forum 3)large disclaimer in the original post.
if you are going to publish info you owe it to the folks who will use it to have double checked your facts and provided correct info,and espeically without typos in a very powerful adb command,especially when you are not providing any real support after the fact.
while you did provide proper credit(thank you) your decision to repost my work without permission and containing typos and misinformation could have well left some m7 and m8 owners with expensive paperweights. lucky for the user the worse thing thats happened is ive had some extra work and a couple of late nights cleaning up the mess from the incorrect command.
Hi, I actually pasted the command lines from your thread as it is and I really have no idea why the ‘ changed to something else. There may be some problem in the font we are using at the site.
I do realize that even our little mistake might cost users a lot and try to be research and read people’s reaction regarding a certain mod or ROM.
Anyway, I have again copied and pasted the command just to be sure that it is correct. Please check it. If it is still the same, I’ll remove this post from the site.
Thanks!
as long as it the site doesnt somehow chage it, the command looks good now. thanks for fixing the issues.
Thanks!
BEWARE, MAJOR ERROR IN COMMAND
TO AUTHOR:
there is a mistake in your command: it is: ‘x00’ NOT ‘x00′ the ‘ ′s are wrong in your post as it writes 3 bytes instead of 1.
Here is the correct command:
echo -ne ‘x00’ | dd of=/dev/block/mmcblk0p6 bs=1 seek=5314564
PS: credits to “scotty1223” from XDA
Corrected!!
I’ve flased a Google Play Edition ROM on my ATT version and this doesn’t work on mine. I issue the echo command and it just sits there and I have to ctrl-C out of it:
su
root@htc_m8:/ # echo -ne `x00′ | dd of=/dev/block/mmcblk0p6 bs=1 seek=5314564
ock/mmcblk0p6 bs=1 seek=5314564
> exit
exit
> exit
exit
> exit
exit
> exit
exit
> ^C
G:$$HTC Android SDKadt-bundle-windows-x86-20140321sdkplatform-tools>
Why would you want to remove it? It’s like a scar you can show everybody and tell a heroic story about …
#embracetheroot (i just felt the need of a hastag there)
im actualy of the same opinion,lol… i like my tampered banner and the red warning text on the splash screen. i turned my tampered flag back to on after verifying it worked and taking the photos 🙂