You are not the only one tasked with having to manage multiple Google accounts on your Android device. It is very common to have multiple Google accounts, especially with the incredible amount of social media platforms available. As you use each account for different purposes, you also tend to use multiple Google IDs — it just happens!
With each new ID you make, you swear that there is no way you are going to forget the credentials. Just give it a couple of days. Soon you’ll be trying every password you’ve ever had because guess what — you forgot. This starts the tedious process of resetting your password (even though you understand why it’s important to go through all the required steps).
Creating a Google Account
When you are making a new account, Google asks you to provide your contact information. This could be an alternative email or your phone number. Google asks for this information, specifically for a situation when you forget your password. It gives them a backup plan and verification process, so you don’t get locked out of your email. It’s a somewhat time-consuming process, having to revisit another account just to get the unique code to reset your password for Google, but it’s simple enough.
Yet, even if you remember all your usernames and passwords, signing in and out to shift between multiple accounts is a pain.
Instead of relying on memory, you could write down everything on a piece of paper. However, you could just keep yourself signed in to all accounts simultaneously. This is, by far, the easier option. Instead of logging out and in every time, all you have to do is switch your ID from the Google homepage/Gmail message view.
Sounds convenient, no?
But how does one manage this? Read on to find out.
Setting Additional Account on Android
Let’s start by adding all of those Google accounts you use!
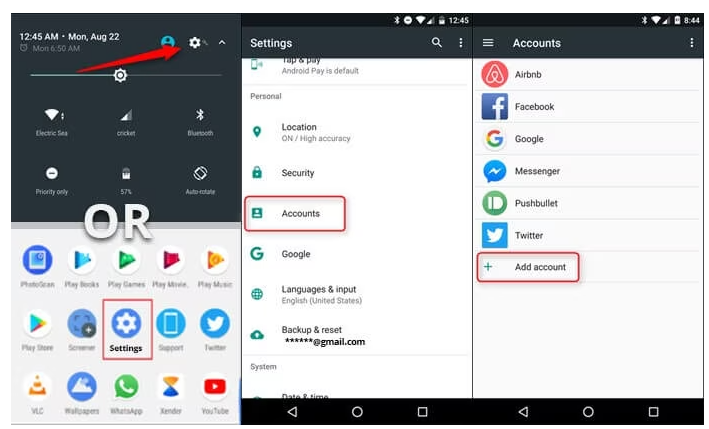
- On your Android device, go to Settings.
- Then go to Accounts.
- You will find an Add Account option — you might have to scroll a bit.
- Select Google Account from the options presented. You may be prompted to type in the device’s password or fingerprint if you use biometrics.
- A prompt will ask you to sign in to your Google account. Keep your password and ID handy if you don’t remember it.
- Sign in to the other account if you have one, or create a new one.
Now your new/existing additional account will always be available on your smartphone along with your Primary one. You can easily switch from one to the other. You can also add more accounts if you want to. Android will sync data from all the accounts you add unless you specify otherwise. You can also remove an account by clicking on the three-dot menu.
What Happens When you Click on Manage Your Account?
Clicking on Manage Your Account gives you many options to customize your account. These are the menu options that you will see.
Home
Under this option, you will find Privacy and Personalization, Account Protection, Account Storage, and Privacy check-up.
Personal Info
This is the information that you provided to Google when signing up. It will list your name, birthday, password, contact details, etc. You can also choose what others see from here.
Data and Personalization
This section shows you a snapshot of your activity on the account, things you create and do, ad personalization, etc.
Security
In Security, you can choose the Two-Step Verification option to make your sign in more secure. You can set ways that Google can verify that it is you who is signing in to the account, apps that have access to your account and your devices, etc.
People and Sharing
Your contacts are stored here, both phone and email. You can also view a list of blocked users and your location sharing options.
Payments and Subscriptions
Finally, you will see information about the payment method you have set up. If you haven’t, you can do it from here. This section also provides you with a record of all your purchases and subscriptions. Like a personal secretary, this section also keeps a record of your flight and hotel bookings from your searches, Maps, and Events that you created on your Calendar.
If you’re in a hurry, a Search option at the bottom of the screen will allow you to type in the option that you need to access. The results will be displayed “live” on the same page. You just have to click on the option for which you’re searching.
You can also switch your accounts from here. The Home page will show your avatar (if you set it up) or your account ID. If you have multiple IDs synced, clicking a small drop arrow pointing downwards will display them. Select the desired account and access the same menu information above for that particular account.
Managing Different Google Accounts on Desktop/Chrome
Of course, you not only can manage your Google accounts from your Android smartphone, but you can also do so on your computer as well.
- Sign in to your existing account.
- On the top right of your browser, you will be able to see your name or profile pic. Click on it.
- A drop-down menu with your full email account will appear. Beneath it, you will see a button that reads Manage your Google Account.
- Further below is a figure sign with a ‘+.’ Right next to it is Add Another Account. Click on it.
- Depending on your settings, you will move from this page to a sign-in screen for your second account, or a new Chrome browser window will open. From both, you can sign in to your other account.
- In case you do not have another one, this is an excellent place to create it. Beneath the sign-in option, you will also see a Create Account option.
- Once you are signed in to your other account, it will automatically be linked with your first one. To switch accounts, repeat Step 2 above. Now the drop-down menu will also feature your other account.
Follow these steps carefully, and you will realize that all your Google accounts are just a button’s press away on your Android!


Join The Discussion: