When it comes to updates, Android has got a couple of things rights. One of them is how updates get installed on a second partition in the background on newer Android versions. The other is OTA or over-the-air Android update. This allows users to directly download and install updates on their phone without needing a PC. Believe it or not, iOS didn’t have it until after Android. Here’s a step-by-step guide But Android users can apply OTA update from ADB sideload and also via stock recovery manually.
Why would anyone want to install OTA updates manually? Because due to the nature of OTA updates, releasing them for all the users worldwide at the same time is not ideal. This will put a strain on the OEM’s servers and they wouldn’t be able to deliver the best downloading experience. Users may face slow downloads or dropped downloads. This is why OTA updates are rolled out in batches.
This means that even though the update for your phone is has been released, you may not see an OTA update on your phone for some time. Fortunately, users who did get the OTA share the update files online. Once you have the OTA file, usually in the .zip format, you apply OTA update from ADB sideload and Android recovery manually.
Download OTA Update File
Before you can flash an OTA update zip package on your device, it’s obvious that you need to download the update file first. To get the OTA update file download link using a Windows PC or your Android smartphone itself, you should refer to our detailed tutorial.
Install OTA Update on Android
Traditionally there are two methods to manually install an OTA update zip files. You can do this via the stock recovery or using ADB sideload command. Some OEMs, especially from the east like Samsung, Xiaomi, OnePlus, etc. bake the option to manually install a downloaded update file right into the Software update Settings.
Apply OTA Update via Recovery
Note: Different phones have different button combinations for booting into recovery mode. If you don’t know how to reboot your specific phone into recovery mode, you can check out our extensive guide on rebooting various Android phones into different modes linked below.
- Download the OTA update zip file.
- Transfer the downloaded zip file to the root of your device’s internal storage (do not put it inside any folder on the internal storage).
- Boot your Android device into the Recovery mode.

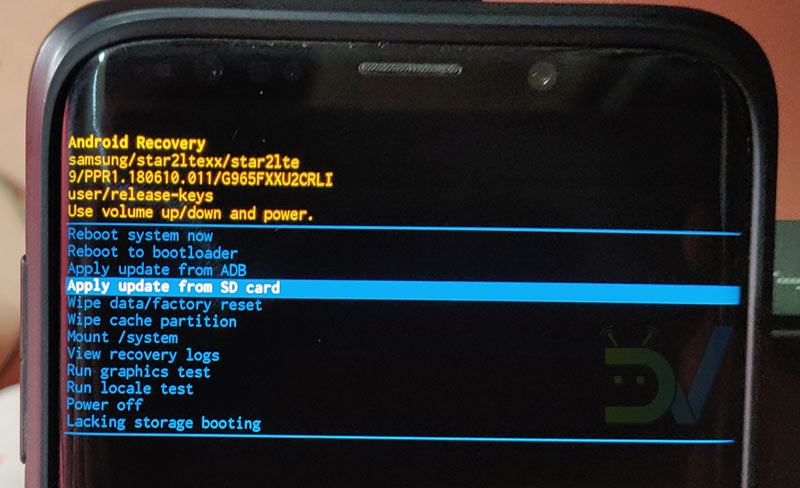
Android stock recovery mode - Use the Volume buttons to navigate to the Apply update or Apply update from SD card option.
- Press the Power button to select it.
- Similarly, navigate to the OTA zip on the internal storage using the Volume buttons and select it using the Power button.
- The update will then start installing.
- Once installed, select reboot from recovery main menu.
Done! You have successfully installed OTA update zip file via Android recovery. Now, we’ll see how to apply OTA update from ADB sideload command in the command prompt.
Don’t Miss: Find Best Performing Kernel for Your Android Device
Apply OTA Update from ADB Sideload
Even for sideloading the OTA update using ADB, you’ll need the stock recovery since the actual installation still happens from the recovery. In order to use ADB sideload to install OTA update, you’ll also need the ADB and Fastboot platform tools on your PC. If you don’t know how to apply OTA update from ADB sideload, we have a guide for you linked below.
- Make sure ADB and Fastboot are set up on your PC. If not, download the latest Android SDK Platform-tools for Windows, Mac, and Linux.
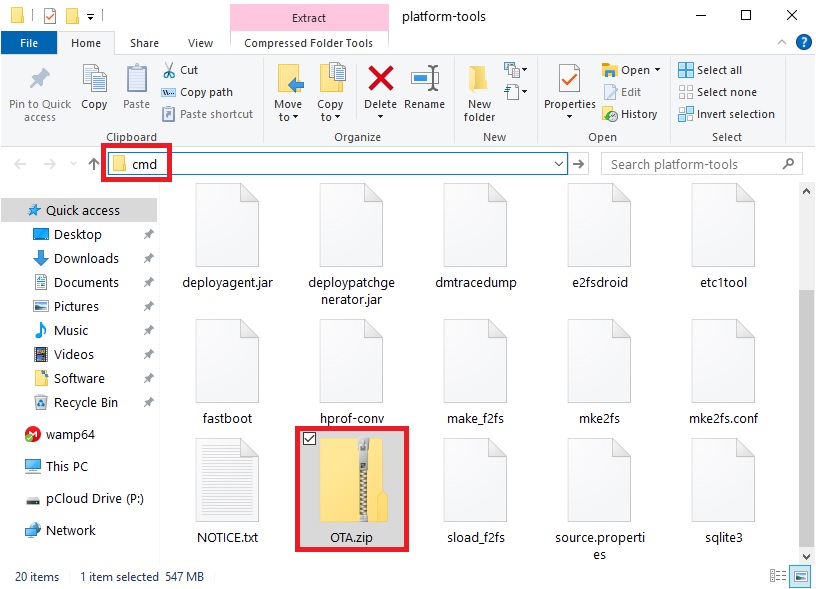
- Rename the downloaded OTA update file to OTA.zip and move it into the platform-tools folder.
- Enable USB Debugging on your Android device.
- Open Settings> About device or phone> Software info on your phone or tablet. On some devices, you’ll find ‘Build number’ after tapping ‘About phone’ option.
- Now scroll to Build number and tap it 7 times.
- You will see a message “You are now a developer!” or “Developer mode has been enabled“, or “Developer mode has been turned on“.
- Return to the main Settings menu and now you’ll be able to see Developer Options.
- Open it and you will find USB debugging option there.
- Enable it.
- Connect your phone to PC.
- Open a command window inside the platform-tools folder that contains ADB and Fastboot files.
- To do this, navigate to the platform-tools folder containing the OTA zip.

OTA zip file in platform-tools - Type cmd in the address bar and hit Enter. On Linux or macOS, right-click inside the folder and select Open in Terminal.
- To do this, navigate to the platform-tools folder containing the OTA zip.
- Connect your Android device to the computer using a USB cable and execute the following command to check that your device is properly connected.
adb devices
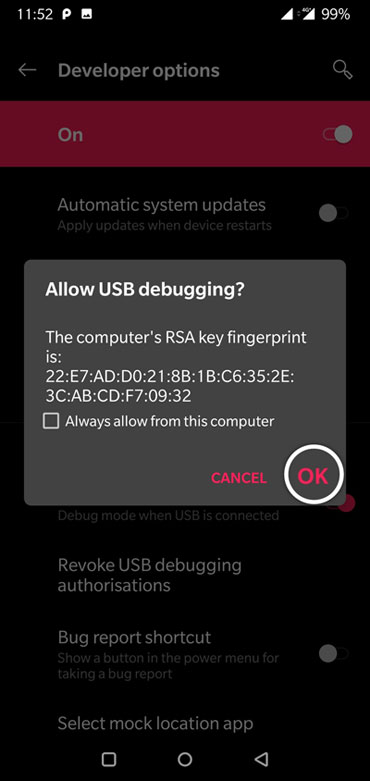
- At this point, you may be asked to “Allow USB debugging” permission to your PC on your phone if you haven’t already.

Allow USB Debugging - Reboot your phone to recovery mode using the button combination or use the command below.
adb reboot recovery
- In the recovery, use the Volume buttons to navigate to Apply update from ADB and select it using the Power button.
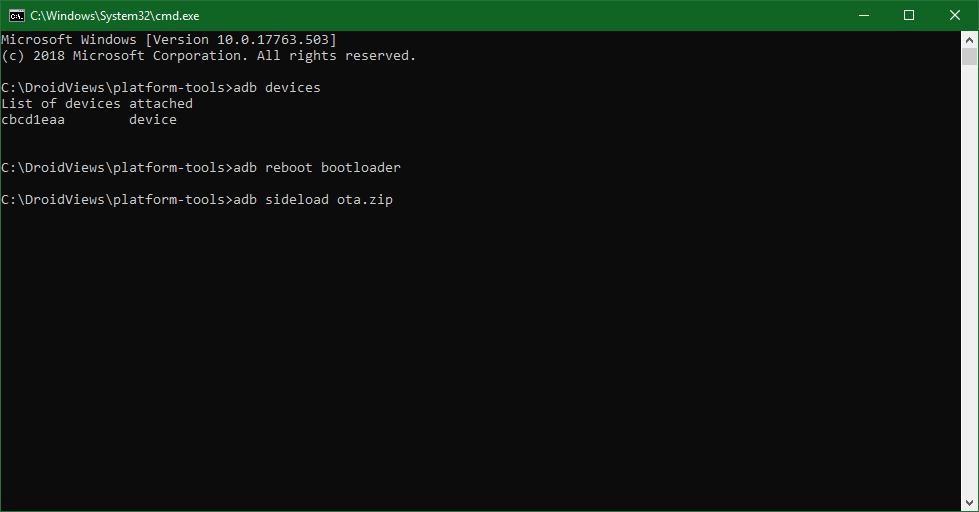
- Now enter the command below in the command prompt or terminal window on your PC to install the OTA Android update on your phone. Executing this command will apply OTA update from ADB sideload.
adb sideload ota.zip

Install OTA update via ADB sideload - This will begin the installation of the OTA Android update. Once complete, select Reboot from the recovery main menu.
That’s it! You have successfully installed OTA zip file via ADB. In case you somehow fail to apply OTA update from ADB sideload or Android recovery, please let us know so that we may help you.
Read Next: Huge List of ADB, ADB Shell and Fastboot Commands


Join The Discussion: