Samsung Galaxy Note 9 Android Pie update with build version N960USQU1CSA7 is now available. Below is a detailed tutorial with steps to update Galaxy Note 9 from Android Oreo to Android Pie (One UI). You can install One UI update on Snapdragon Galaxy Note 9 with model numbers SM-N960, SM-N960U1, and SM-N960W.
For those not in the loop, Samsung announced a brand new interface design for their smartphones which will be coming to all devices that receive the Android Pie update. The new interface has been designed keeping in mind the super tall screen aspect ratio of the modern smartphone. Essentially, the interactive parts of an app are towards the bottom where your fingers can easily reach them. The upper half of the screen, Samsung says, should be the viewing area where you can see information but don’t have to interact with it. You can now upgrade Samsung’s currently latest flagship, the Samsung Galaxy Note 9 from Android Oreo to Android Pie based One UI.
Warning
Although the firmware you’ll be installing is official, it isn’t officially available for the Galaxy Note 9 yet. Samsung is yet to roll out the Android Pie update which means they’re probably working on ironing out something. So keep in mind that you may face minor bugs here and there although nothing major. The beta firmware available is an AT&T firmware which means it does come pre-loaded with a handful AT&T bloat apps. Moreover, the firmware shared is only meant to be installed on the Galaxy Note 9 devices with model number SM-N960, SM-N960U1, or SM-N960W. Trying to install it on other variants might not end well.
The process to upgrade that is described below will wipe all your data so make sure you have a backup of everything that’s important.
Requirements
- A Samsung Galaxy Note 9 – SM-N960/SM-N960U1/SM-N960W.
- Unlocked bootloader
- Make sure the battery is charged up to at least 50%
- A Windows PC with the latest Samsung USB Drivers.
Downloads
Download all the three files and extract AT&T N960USQS1ARJA and Odin3_v3.13.1_3B_PatcheD on your PC, and transfer N960USQS1ARJA-U1CSA7 to an external SD card. In case you don’t have an external SD card, you’ll need ADB and Fastboot on your PC.
Galaxy Note 9 Android Pie Update – Oreo to One UI
Now follow the steps given below to enjoy Samsung One UI Android Pie experience on your Galaxy Note 9.
Flash AT&T N960USQS1ARJA with Odin
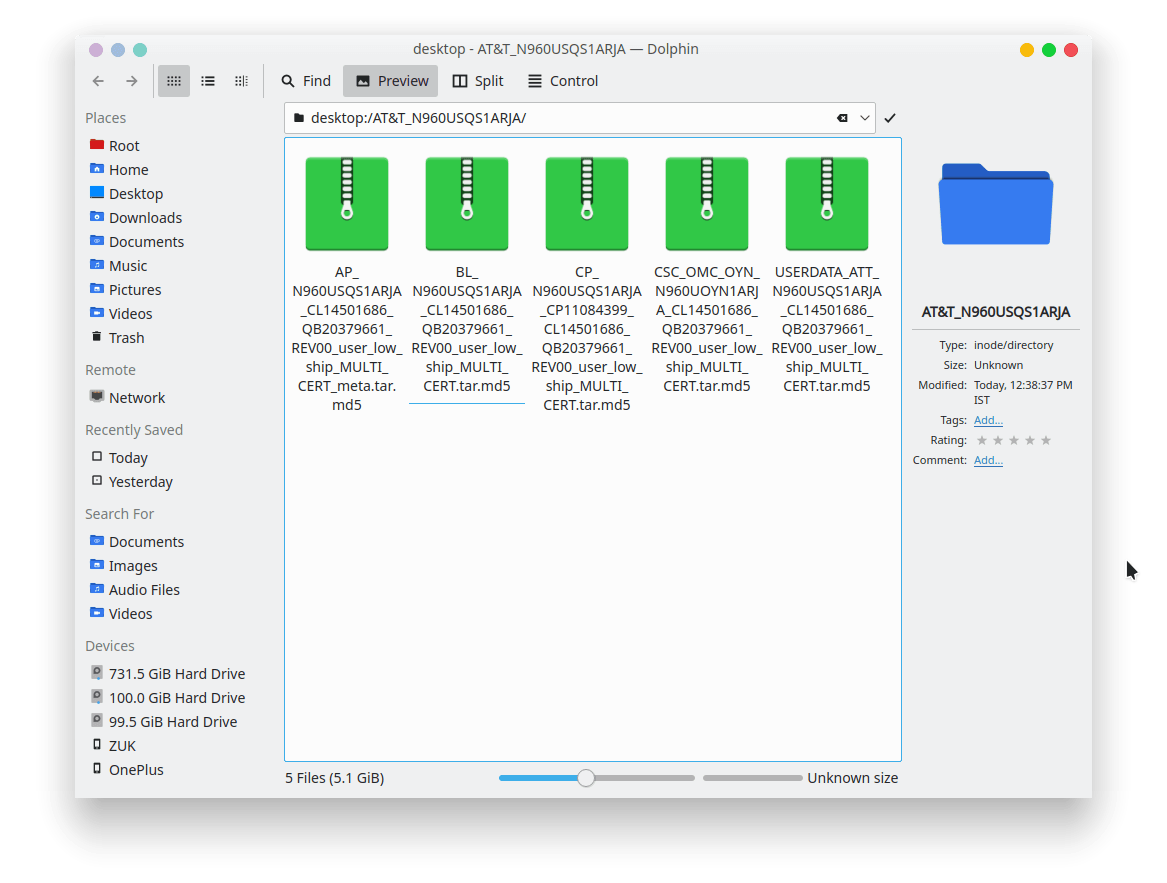
- Launch the Odin executable from the extracted Odin folder and extract the downloaded firmware file too.

Galaxy Note 9 firmware files - Now reboot your Galaxy Note 9 to download mode.
- Power off the device.
- Press and hold the Power button + Volume Down + Bixby button. Press the Volume Up button to continue when you’re prompted to confirm whether you want to install a custom OS.
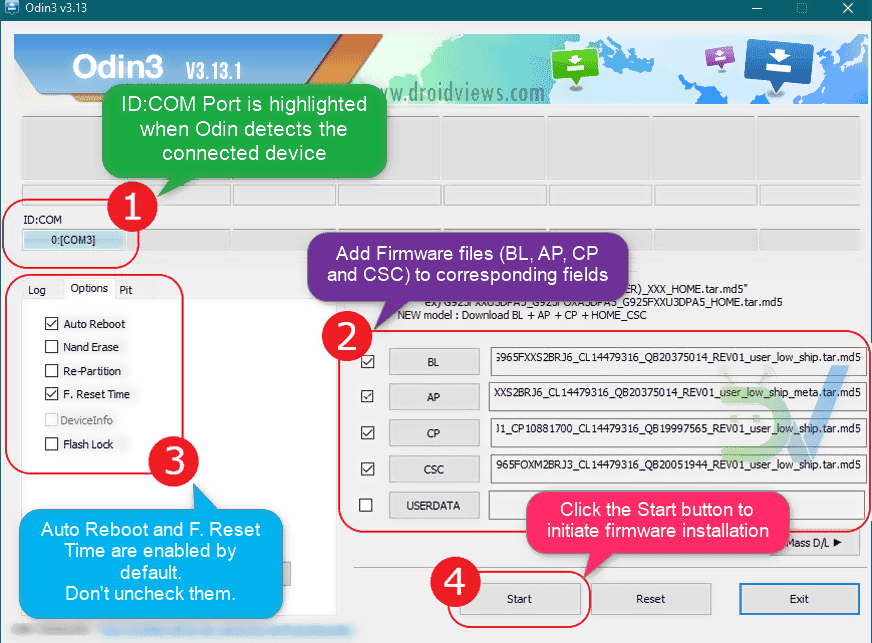
- Launch Odin and connect your phone to the PC with a USB Cable then. If Odin detects your device, you should see Added!! message on the left under Log.
- In Odin, click on the BL button and navigate to the extracted AT&T N960USQS1ARJA folder. Here, select the file named (generally, a file with the initials BL).
- Similarly, click on the AP button and select the file which has a name that starts with AP. Then click CP and CSC and select the corresponding files with names starting with CP and CSC. When you’re done, the AP, BL, CP and CSC fields should be populated with the respective AT&T N960USQS1ARJA files.

Flashing stock firmware using Odin - Click on the Start button in Odin to flash the N960USQS1ARJA firmware. When the process is complete, your device will reboot into recovery automatically although the flashing could take a while. If it doesn’t automatically reboot into recovery, you can manually do it by pressing and holding the Volume Up + Bixby button + Power key while the device is powered off.
Sideload N960USQS1ARJA-U1CSA7.zip via Recovery or ADB
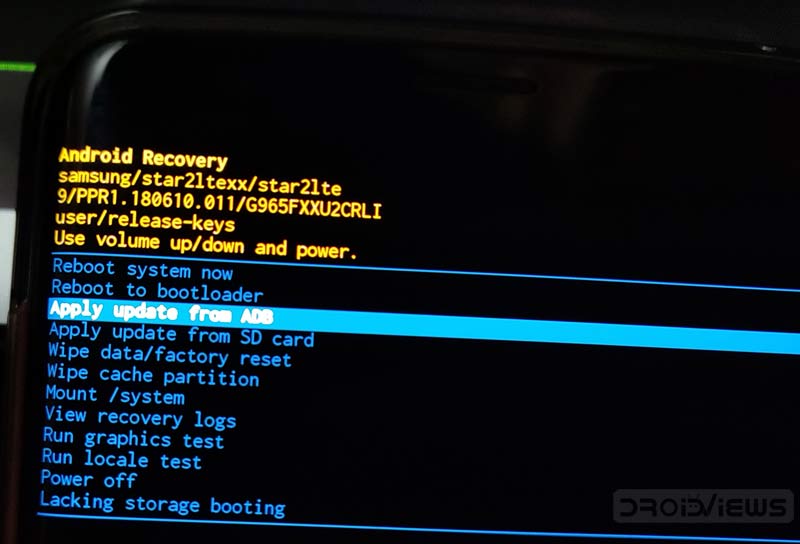
- In the recovery mode, use the Volume buttons to highlight Wipe data/factory reset and the Power button to select it. Confirm the selection similarly by selecting Yes. After the wipe is complete, you’ll be taken back to the main screen of the recovery menu.
- Once again, highlight apply update from SD card option using the Volume buttons and select it using the Power button. If you don’t have an SD card, select apply update from adb instead.
- If you want to sideload the update.zip file via ADB, select apply update from ADB option.

Samsung Stock Recovery - Extract the “platform-tools” zip file that you downloaded from above and copy
N960USQS1ARJA-U1CSA7.zip file to the folder it. Then launch a command window (inside the platform-tools folder) on your PC and enter the following command.adb sideload N960USQS1ARJA-U1CSA7.zip
Your phone will then be flashed with the N960USQS1ARJA-U1CSA7 firmware and reboot into Android 9.0 Pie (One UI) automatically.


Join The Discussion: