Be it the monthly security update patches or a major Android version upgrade, the Google Pixel devices are among the first devices to receive them. Google makes Android so it makes sense that Google devices are the very first of devices to receive any kind of updates before any other devices. But Google’s devices, such as the Google Pixel devices, also run stock Android out of the box. Stock Android is great, and many people find it just perfect too. Yet, it gives you the most reasons to root these devices. The problem here is that this is a constant struggle between updates and root access. There’s also a safer, better way to install the latest Google software update on rooted Google Pixel devices, without losing root.
Requirements
- A rooted Google Pixel device running the original Android firmware from Google.
- The stock factory image for your Google Pixel device. You can download this from the Downloads section below.
- Google SDK Platform tools are required. You can download this from the Downloads section below, depending on your desktop OS.
- Enable USB debugging on your phone.
Downloads
-
- SDK Platform-Tools for
- Official factory images from Google developer website
- Magisk
- TWRP – You can download TWRP from the official TWRP website by searching for your device name. We’ve linked recoveries for some of the popular Google Pixel devices below.
Advantages of using this method
- User data and applications are kept intact.
- There is no need to remove your PIN, password, or fingerprint.
- There is also no need to remove TWRP, Magisk, your custom kernel, or anything.
Warning
The method is intended to be used for the monthly security updates and could also possibly work with major Android version upgrades. We don’t recommend using this method with a developer preview or a beta release. However, it could still work with them, or only partially work with them or not work at all. You’re welcome to try.
How to install latest Google software update
- Extract the downloaded platform-tools zip file. This will give you a folder named platform-tools.
- Download the factory image from the Google Developers website, also linked above in the Downloads section. Make sure you download the full factory image, not an OTA update.
- You will receive a zip file, extract it and you will see a list of files. We’re using the Google Pixel 2 (codenamed ‘walleye’) as an example here. In this instance, the list of files extracted will be:
- bootloader-walleye-[version string].img
- flash-all.bat
- flash-all.sh
- flash-base.sh
- image-walleye-[version string].zip
- radio-walleye-[version string].img
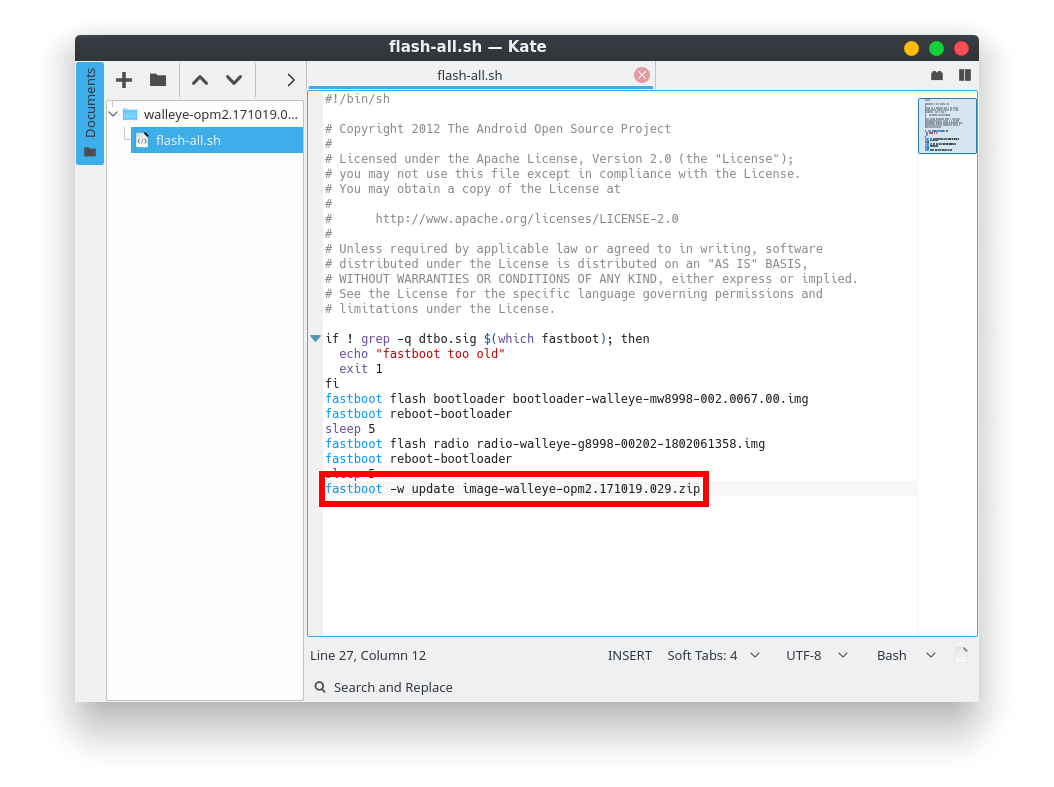
- Right-click on the flash-all file and open it with a text editor of your choice (flash-all.bat for Windows, flash-all.sh for Linux).
- Find the line that reads fastboot -w update image-walleye-[version].zip and remove -w. The -w is the wipe user data switch. Thus, removing it prevents the user data from being wiped during the process. Close the file but make sure you save the changes.

- Now move or copy all the extracted files to your platform-tools folder.
- Plug your phone to the PC with a USB cable and launch a command prompt/terminal window inside the platform-tools folder.
- On Windows, you can do this by entering cmd in the address bar while inside the platform-tools folder.
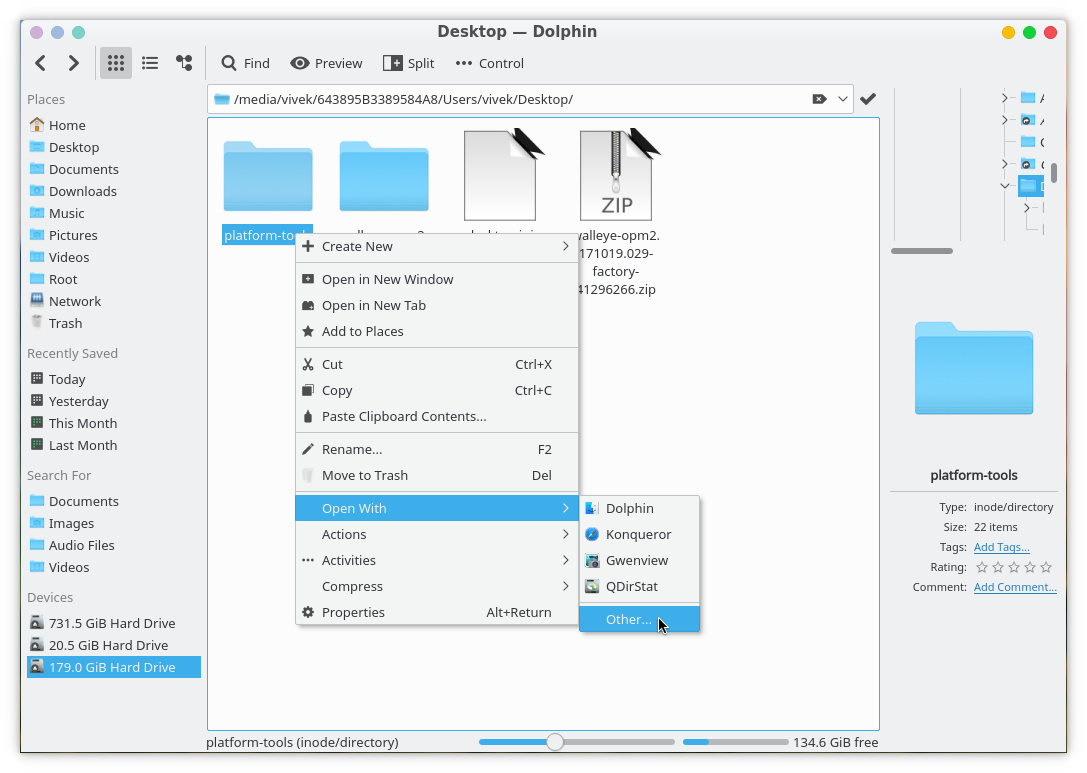
- On Linux, depending on your file manager, the process can differ. A general way would be to right-click on the platform-tools folder and select Open with (Open in another application) and then selecting your Terminal app.

- From here on out the process is quite straight-forward. Reboot your device into bootloader mode using this command:
adb reboot bootloader
- Execute update script in the terminal/command prompt with either of the following commands depending upon your OS:
- Windows:
flash-all.bat
- Linux/OSX:
./flash-all.sh
- Windows:
- This will start the update process and your device will reboot a few times while updating.
Restore root and recovery
- Download the appropriate TWRP recovery image for your device. If you also want to root, download the latest Magisk zip as well. Download links to both of these are available in the Downloads section above. Move or copy the downloaded files to the platform-tools folder.
- When your device is upgraded, reboot it to bootloader mode using the same command as before.
- Flash the TWRP image file using the following command.
fastboot boot twrp.imgReplace twrp with the name of the downloaded twrp image file.
- Execute the following commands one by one. These simply push the magisk zip and the twrp image file into a folder on your device named tmp. Once again, replace magisk and twrp with the actual file names.
adb push magisk.zip /tmp
adb push twrp.zip /tmp
- Now install both TWRP and Magisk using the commands given below:
adb shell twrp install /tmp/twrp.zip
adb shell twrp install /tmp/magisk.zip
As always, make sure you replace the correct file names in place of magisk and twrp.
- When you’re done, type reboot and hit enter to reboot your device again.
That’s it! You have successfully updated your rooted Google Pixel phone.


Join The Discussion: