Today, we aim at instructing you on how to Root, Install ClockworkMod Recovery and custom ROM on Galaxy Nexus GSM I9250. Our Android community is expanding every single minute and each minute a lot of new users join us. Since everyone here is not expected to be aware of the word “Root”, “Custom Recovery” & “Custom ROMs”, so I will be defining and explaining these basic Android terms to you. Further, if you doubt anything, make sure to ask us through your comments and we’ll make our best efforts to solve your queries.
Note, this guide is strictly for Windows users and would not work on MAC OS or any of the Linux-based OS. I will be splitting the guide into subparts for the ease of understanding.
Terminology
- Rooting: Rooting is a process that allows any Android smartphone/ tablet user to gain root privileges over the android subsystem. Rooting not only helps in removing carrier limitations but also serves a purpose to change, remove or install an operating system.
- ClockworkMod (CWM): A Linux/ UNIX operating system employs a recovery and since Android being based on Linux also has recovery. Clockworkmod is a secondary recovery system created by Koush, which adds enormous features like wiping partitions, flashing flashable .zip files like ROMs, kernels, patches, etc to the stock device recovery.
- Custom ROMs: These are the aftermarket Android firmware which is not officially supported by the device manufacturer. They are made available to the world by Android developers all around the world. Custom ROMs are either built from Google’s source code i.e AOSP (Android Open Source Project) or are modified versions of the device manufacturer’s ROM (Stock ROMs or Factory ROMs) with additional tweaks and extend functions which are not delivered with the Stock ROMs. Some of the popular Custom ROMs include CyanogenMod (CM), Android Open Kang Project (AOKP), MIUI, Codename Android (CNA), Oxygen, ParanoidAndroid and many more.
Advantages of Rooting a Galaxy Nexus:
A rooted Galaxy Nexus has always had enormous advantages over its unrooted variant. Rooting denies all the limits that a device manufacturer or a carrier can force. It shall allow Android system access to any user which not only enables it to use certain apps but also allows to modify/ change the device kernel & its flash system.
Are you afraid of rooting your device? Why so? because rooting can cause warranty issues in some Countries? Look, If rooting allows you to be the master of your device, being a master you can always command your device to go in the stock condition again. In simple words, If you can flash Custom ROMs/ Recoveries/ Kernels, then you can also restore everything to its factory condition easily. So, no more warranty issues.
Prerequisites
- A USB data cable compatible with Galaxy Nexus.
- Proper Nexus USB drivers for a successful connection between the device & PC.
- Install them and afterward reboot the PC.
- Enable USB Debugging in your device’s settings [Settings > Developer Settings > tick “USB Debugging”].
- Backup your Messages, Contacts, Apps & Internal storage manually before proceeding any further. Things here are not harmful but we keep ourselves on the safe side. Don’t we?
- Make sure to have sufficient battery charge left in your device (at least 60%) to avoid any mishaps during the process.
How to unlock the Bootloader
- Install Android SDK Platform-tools properly on your Windows PC by following the set of instructions here.
- In order to unlock the device, we need a few extra files besides those delivered by the SDK itself.
- Download these 3 files, namely fastboot.exe, AdbWinApi.dll & AdbWinUsbApi.dll.
- Extract the downloaded zip file.
- Now, copy the 3 files to your platform-tools folder inside your Android SDK directory. In my case, it is ” C:\sdk\platform-tools”.
- Open the same folder where you dragged the downloaded files.
- Press shift + right click and select “Open command window here”. This will open the command prompt in the same location.
- Connect your Galaxy Nexus to the PC via the USB data cable.
- Type in the following command into the command prompt:

adb reboot bootloader
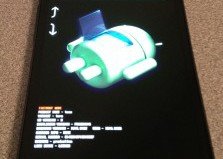
- This will boot your Nexus into the bootloader mode.
- Type in another command:
fastboot oem unlock
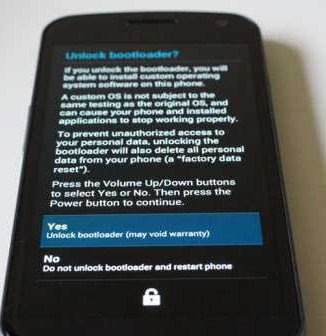
- The phone will now pop up a message to confirm if you want to unlock your bootloader. Use the volume keys to highlight “Yes” and select it with the Power button.

- DONE! You have successfully unlocked your Galaxy Nexus’s bootloader. The device will now reboot and hard reset itself, which might take time. So, Do Not I repeat, d0 NOT pull out the battery or mess with your device while it reboots. If you assure me that you haven’t messed, then I assure that your device is completely fine and safe.
How to Install ClockworkMod Recovery
- We have already downloaded and placed the correct fastboot files into their location in the previous steps while unlocking the bootloader.
- Download CWM Touch Recovery 6.0.1.0 for Galaxy Nexus GSM (maguro): Download Here
- Rename the downloaded recovery-clockwork-touch-6.0.1.0-maguro.img to CWM.img for ease.
- Now place the CWM.img to the platform-tools folder of your Android SDK. Its the same location where we placed all the fastboot files.
- Power off your Nexus, now press the volume up + volume down + power buttons simultaneously until you see the fastboot mode (bootloader mode).

- Now, connect your Galaxy Nexus to the PC via USB data cable.
- Go to your platform-tools folder in your Android SDK directory. Press shift + right click. Now go to “Open command window here”. This will open a new command prompt with the same location.

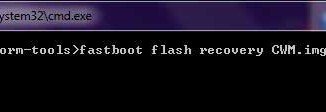
- Type the following command to flash the recovery image file to the device:

fastboot flash recovery CWM.img
- The command window will show the following output when it has done flashing the Recovery image file your device successfully. [click to view screenshot]
- Type in the following command:

fastboot reboot
- This will reboot your device. So you have successfully flashed CWM Touch Recovery on your Galaxy Nexus. [click to view screenshot]

How to Root Galaxy Nexus
- Download the flashable SuperSU binaries zip
- Connect your Galaxy Nexus to the PC via USB data cable & enable mass storage mode.
- Copy the downloaded zip to your storage.
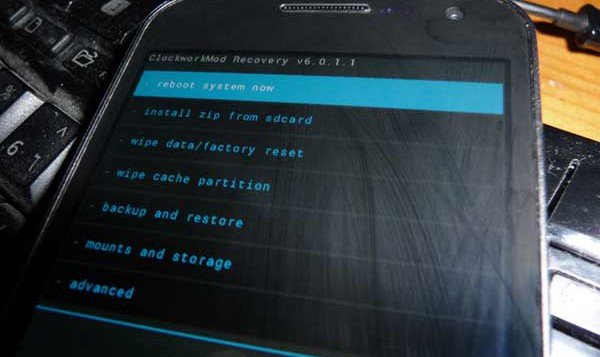
- Power off your device and now reboot your phone into CWM Recovery by pressing volume up + volume down + power buttons simultaneously until you see the blue recovery text. (Remember, earlier the combo of the same buttons was used to boot into bootloader/ fastboot mode but now since the CWM has been installed, the same pattern will be used to boot CWM.)
- Go to “Install zip from sdcard”, select “choose zip from sdcard”. Now choose the zip file that you placed in the SD card.
- It will notify when the flashing process is complete.
- Select “Reboot system now”.
Congratulations! You have easily rooted your GSM Galaxy Nexus within a few minutes.
Now we have our Galaxy Nexus fully unlocked and rooted. Plus we have also configured the utility to install (flash) custom ROMs i.e the ClockworkMod Recovery. I will now begin to instruct you with the easy steps to install a Custom ROM to your Galaxy Nexus I9250 (GSM).
How to Install a Custom ROM
- The first step of all is to choose a custom ROM which meets all your requirements and fulfill your desire for custom features. You can find all the available Custom ROMs for Galaxy Nexus I9250 at XDA-Developers forum. Once you find the ROM that suits you the best, step 2 is what you should follow.
- Download the ROM file which is a flashable file with .zip extension and save it in a secure location on your PC.
- Download the Gapps for your ROM (if provided by the ROM developer). If not, download the generic gapps.
- Connect your Galaxy Nexus to the PC via USB data cable & enable mass storage.
- Copy and paste the download flashable zip files to your device’s storage.
- Power off your device.
- Boot into CWM Recovery by pressing volume up + volume down + power buttons simultaneously until you see the blue recovery text.
- Wipe data/ factory reset.
- Go to “Mounts and Storage” and wipe /system.
- Go to “advanced” and wipe dalvik cache.
- Go to “Install zip from sdcard”, select “choose zip from sdcard” and choose the ROM zip file. Choose to flash and wait for a while.
- When it has done flashing, it will notify automatically.
- In case it takes time, do not pull out the battery. Have patience because everything is going just the way it is meant to until you follow the steps exactly.
- You shall now flash the Gapps the same way you flashed the ROM file.
- If you have any ROM add-on provided by the ROM developer, they are to be flashed in exactly the same way as the ROM and Gapps.
- Select “Reboot system now” when all the flashing has been done.
Voila! Now you shall sit back and give some time for your new Custom ROM to boot.
Wasn’t that all pretty much easy or no? Please do give us your feedback. If you have any queries or in case you have stuck anywhere during this tutorial, comment right away and we assure to serve you the best with our knowledge.


do i need to reboot it by pressing power
my phone is taking forever after i unlocked the bootloader
Lock and unlock the bootloader once again. 😉