
Hey all folks! Just today we talked about GSM Galaxy Nexus receiving Jelly Bean 4.2.1 update. But if you’re not that fortunate to receive the OTA update, then you must also not put up a sad face cause we are here. This guide and its instructions will enlight the way to flash the Jelly Bean 4.2.1 factory image to your International unlocked Galaxy Nexus. We are gonna put to use the famous fastboot method to flash the update, so please stick along the guide and do as we say.
Disclaimer:
Droidviews.com or the developers of this method will not be responsible for any kind of damage held to your device either in the past or in the upcoming future. This guide is only for windows OS & GSM Galaxy Nexus I9250 users. Proceed only when you are sure what it is all about.
Prerequisites
- At least 60% of your phone battery.
- A USB Data cable compatible with your Galaxy Nexus.
- Appropriate Universal Naked USB Driver 0.72. [Download here]
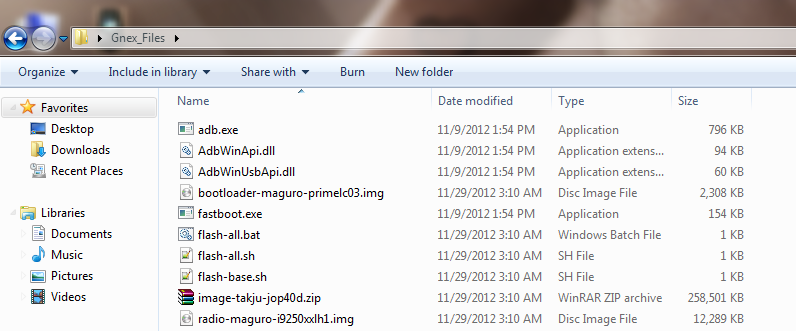
- Required ADB & Fastboot files. Extract the downloaded Gnex_Files.zip to your desktop. So now you have Gnex_Files folder on your desktop.
- Backup your complete SD Storage, text messages and contacts manually.
How to flash 4.2.1 factory image on Galaxy Nexus I9250 (maguro)
- Download the factory image zip (takju-jop40d-factory-e4d13f14.tgz) for your Galaxy Nexus. [Download here]
- Extract the contents of the downloaded takju-jop40d-factory-e4d13f14.tgz to your Gnex_Files folder already present on your desktop. So, now we have files like these inside the Gnex_Files folder:
- Power off your Nexus, now press the volume up + volume down + power buttons simultaneously until you see the fastboot mode (bootloader mode).
- Now, connect your Galaxy Nexus to the PC via USB data cable.
- Open the Gnex_Files folder that you have on the desktop.
- Press shift key + right click on an empty space, select “Open command prompt here“.
- You’re now going to erase everything on your device, type the following commands one by one:
fastboot erase boot
fastboot erase cache
fastboot erase recovery
fastboot erase system
fastboot erase userdata
Note: Do not close the CMD window.
- Flash the bootloader. Type:
fastboot flash bootloader bootloader-maguro-primelc03.img
- Reboot bootloader mode (This is necessary):
fastboot reboot-bootloader
- Flash the Radio (baseband) . Type:
fastboot flash radio radio-maguro-i9250xxlh1.img
- Reboot bootloader mode again. Type:
fastboot reboot-bootloader
- Flash the ROM image:
fastboot -w update image-takju-jop40d.zip
- When everything is done, you will be notified by the command prompt. Now type in the following in CMD to reboot your Galaxy Nexus.
fastboot reboot
Congratulations! You have successfully updated to 4.2.1 Jelly Bean on your unlocked Galaxy Nexus I9250 (maguro). Have you got any feedback or queries? Comment!


Please help! I already erased the bootloader bevore and now i can’t do anything.
Unfortunately i didn’t unlock the bootloader bevore. Is there any way to flash anything?
Made it 🙂
thanks anyway
hi i already did all the steps, but when it finished, it hang at X(jellybean) logo.. what to do?
Everything works up until I try to flash the radio (baseband) in the CMD window. It ‘sends’ the radio OKAY, but FAILED ‘writing’. Simply says:
FAILED please help.
after flashing radio, make sure to reboot bootloader mode by typing: fastboot reboot-bootloader
Dhananjay
I have entered the first command “fastboot erase boot” and all i get is waiting for device
I have installed the samsung usb drivers
When the device is connected in fastboot (bootloader) mode, type: fastboot devices
And see if it shows the device.
Now I return back to 4.1.2 but I like 4.2.2. I’m planing to return again but how about the adb ang bootloader always telling ofline pls admin advise me what’s the best idea with it
You’ve problems with setting up adb interface drivers, its quiet common issue.
Contact me: worldallaroundme@gmail.com
Hi me here I already flash 4.2.2 but now adb doesn’t recognize always telling ofline what should I do sir
Um… I kinda closed the CMD window. I only did the first one but it is taking really long time, is that normal?
The factory image zip is going to an error for me.
Yes, because 4.2.1 factory images have been pulled off from Google servers. The updated Images of 4.2.2 Jellybean JDQ39 are now available: http://goo.gl/l2PRk
In case you have closed the CMD window, type: adb reboot bootloader
and start from the beginning. And please make sure to follow every command, do not neglect even a single command for your device’s safety.
Me my gnx I flash it to 4.2.2 but thers a problem adb is ofline what should I do sir
Sir ahm is it ok if I will flash takju on my gnx coz I’m using yakju is there a problem if I try these idea sir
ADB might show offline if drivers are not installed/configured correctly.
You can try any of them.
Thanks a lot man… i tried to update my device by reading some other post & after that my phone did not boot. Following you steps my phone came alive… now it is running on JB 4.2.2… thanks..
Hi, I have a rooted nexus which is running jb 4.1and recently I received an OTA update notification for 4.2 but when I try to download and update, the android thing dies saying installation aborted, I’m looking a reason, can u please help. Thanks
This might be due to your rooted device. I’m pretty sure that the notification was for 4.2.2 update, if it was so, follow this guide to update manually: http://droidviews.com/?p=9411
Thanks a lot for sharing this article 🙂
Hi I downloaded the images, none of them have the radio or bootloader image. Am I missing something.
What’s the file name of the downloaded image?
Never mind I figured it out, the new factory images don’t have the bootloader and radio images. I found an older image that does and successfully flashed the phone. Thanks for the response
Glad to hear that you have it solved.
nevermind, figured it out. you should have posted that you need to extract the TGZ file, then containing TAR file. that wasnt apparent. Thanks for the great guide though 🙂
The Images have now been updated giving TGZ and TAR files.
I followed your steps to a T but i cant perform the last step. I downloaded the takju-jop40d-factory-e4d13f14.tgz file, and when i extract it, i get takju-jop40d-factory-e4d13f14.tar. I noticed that you have the file as image-takju-jop40d.zip. Did you conver the file somehow, there seems to be a missing step as I cant flash the rom.
I can’t do anything. It said something like ‘oem locked’. What should I do?
In order to perform this guide, you need to unlock your bootloader. Unlock it by following this guide: http://droidviews.com/2012/guideunlock-bootloader-root-install-cwm-custom-roms-on-galaxy-nexus-i9250/
is that necessary to use erase commands?? but we have “-w” that means “wipe”
Yes, the -w command is to “write” the image to the partition layout of the device.
excuse me sir, but “-w” in fastboot command is to erase userdata and cache.
Well, yes. Sorry for the misconception.
And yes its necessary to use erase command. Its advised by most. But you can try otherwise too and see what happens 🙂
I haven’t done that yet, so can’t give any confirmation.
i have downloaded Yakju Factory image . and the problem is that i am ver weak at all this stuff can someone help me on team viewer or something and plz tell me what to do… i am dead tired searching al forums and i recently factory reset it …. its not connecting to my home WIFI m very bugged plz help
Yes, sure. I can help you with that. Contact me: worldallaroundme@gmail.com
Help! I did as described and when I typed:
“fastboot flash bootloader bootloader-maguro-primelc03.img”
I got: “error: cannot load ‘bootloader-maguro-primelc03.img’: Unknown error.
I have a Galaxy Nexus maguro, the bootloader was unlocked, I had rooted it and tried out several custom ROMs with TWRP, but since, I’m stuck on the bootloader. If I swich it on it gets stuck there, whether I long press the power button or if I long press both volume buttons too.
Any idea what to do now would be greatly appreciated!
I ended up using Odin mode to flash the stock AOSP 4.2.1 ROM to fix this 🙂
nice 🙂
I follow all steps but finally when I type “fastboot reboot” then I still be in fastboot mode (bootloader mode), so how can I solve this and when I click Start the phone still fastboot mode (bootloader mode).
If the flashing process of the image was successful, you can simply take out the battery and power it on.
having some hick up to start mainly driver from samsung not working , after getting universal naked driver , everything goes smooth and now got 4.2 jelly bean . many thanks
There’s something wrong with my pc or the drivers because I can’t install the drivers for Android 1.0 on the Device Manager. Any guess? Thanks!
Try these drivers: http://forum.xda-developers.com/showthread.php?t=1996051
They work perfectly upto the mark 😉
Ok, the drivers work but after the all process the phone is stuck on Android 4.1.1. Any guess?
I don’t know why that this guest message appeared because I deleted it. lol Ok, so my nexus has the 4.2.1 now but it doesn’t connect to my wireless at home. It gets stuck on Authenticating…Any ideas?
Thanks a lot and thank you for the tutorial! 🙂
It is now fixed. Just hit restart on the admin console on the router and it now works. Don’t ask me how.
You’re welcome, friend.
Could you please brief me about your current situation?
Thanks a lot!
You’re welcome my friend.
thanks, work for me with yakju. 🙂
You’re welcome! We’ll always be here to help you 🙂
thanks – very good article
We are glad that It was helpful to you.
A MILLION THANKS DJ! WORKS FOR ME! 🙂
Glad to hear that,you have our warm welcome.
Can I go from 4.1.2 to 4.2.1? My phone keeps trying to install the OTA but I receive an error message (android with red exclamation point) so I am thinking about flashing it.
Yes, undoubtedly.
So I can follow the same steps above and go from 4.1.2 to 4.2.1, and skip 4.2? I have never flashed before, and feeling a little bit nervous about it.
If you intend to flash factory image using this guide then you shall skip 4.2. Be confident about what you are doing and follow just as mentioned. If anyhow you come across any problem, you shall comment here.
All the best with it
can it be flashe without unlocking the bootloader?
No, it can’t be performed without unlocking the bootloader.
Everything has been like clockwork until I tried flashing JOP40D. What to do 🙁
Could you please elaborate your situation?
Thank you for taking out time to respond 🙂
Apparently, I entered the command line ..takju… instead of …yakju… which I downloaded. I was able to get the device updated to 4.2 successfully. However, the radio and IMEI read UNKNOWN which means I can’t connect to a mobile network…
what is your device model?
Its the international version; i9250
Just make sure to follow every step to the point and do not miss any command. You will get everything fine. 🙂